Android N-ify | Android N Look and feel without updating !


Android N-ify or simply Android Nify is a new module for Android devices that lets you enjoy several Android N features on your Marshmallow or Lollipop device. You can use new features like Settings dashboard subtitles and double-tap recents for switching to the last app. Of course, the Android N-ify APK download module is pretty new right now, and more features will be added with the future updates. It’s a great idea for users who have devices that can’t be upgraded to Android N or even Marshmallow.
Do note that Android Nify is still in its experimental phase and needs to be tested on more and more devices. A new update with version number 0.1.2 has already been released and it brings Romanian translation support with it. It also fixed the settings tile and double tap recents bug and removed the print tile summary that was causing a huge performance issue.
The latest Android N-ify APK v0.1.2 weighs just 0.06 MB, and it works on all devices running on Android 5.0 Lollipop or above. You can download Android N-ify APK from the source link given below.


Requirements

  • Rooted Device
  • Running Android Lolipop Or Higher.
  • Xposed Framework
  • Working Mind


How To Install ?

  1. First Of All Click On This Link.
  2. Now Choose Xposed.
  3. Now You Can See Module In Xposed.
  4. Download And Install It.
  5. Apply The Module And Reboot.
  6. Enjoy!!!


Screen Shots


Do let us know about your experience with Android Nify in the comments below.

Install SuperSU and Xposed on Android One 1st gen Running Latest Android 6.0.1

Hello Guys 
First of all I am sorry for too long Post because it is made for Newbies on Rooting. If your novice skip some known steps.
In this post I am going to show you. How to Root and Install Xposed your Android One 1st Generation Running Android Marshmallow 6.0.1 Because you may probably lost root and xposed on your device due to the recent update. This method allows you to root without losing stock recovery and works with both locked and unlocked bootloader
Let's Start the steps to Install


Instructions:
  • Step 1: Safety First Perform a Nandroid Backup
  • Step 2:Download the modified the boot/kernel image from Here and copy it in Minimal ADB and Fastboot installation directory , SuperSU from here , Xposed from here and copy it in your SD card
  • Step 3:Make Sure that you have ADB drivers installed a your PC. If not install ADB Drives by installing the software called PDAnet by clicking here
  • Step 4: Download Minimal ADB and Fastboot here
  • Step 5: After That Download the desired Recovery for your Mobile ( TWRP-8.6MB here & Philz-6.2MB here) Then rename it as any name Example TWRP as rec1 and Philz as rec2 
  • Step 6: Power Off your Mobile and get in to Bootloader by pressing Vol Up + Power Release after Karbonn Logo Then select Fastboot and connect it to PC
  • Step 7: Then Open Minimal ADB and Fastboot Shortcut Created on your Desktop and Check the Device connected or not by typing this on command prompt 
  • Step 8: If Device connected you will get device info like "device     LSXXXXXXXX" Check the Screenshot below.
    If not try good cable or wait if you are new installed ADB Drives

  • Step 9: Then Type the following to flash kernal (Becoz Stock Kernel doesn't allows Root)   "fastboot flash boot android_one_6.0.1_modified_boot.img"   (Remove quotes &Wait 30 Sec)
  • Step 10: Then Type the following for flash temporary/one time use recovery   "fastboot boot xxxx.img"    Note:change xxxx to renamed recovery name Example If you renamed as above TWRP is   "fastboot boot rec1.img"   and Philz is   "fastboot boot rec2.img"   
  •  Type this for Permanent Custom Recovery   "fastboot flash recovery xxxx.img"   Note: change xxxx to renamed recovery name Example If you renamed as above TWRP is    "fastboot flash recovery rec1.img"    and Philz is    "fastboot flash recovery rec2.img"   

  • Step 11: Then Flash the Zip file as Needed...... Reboot... Now you get Rooted and Xposed Android One.


Note: Above trick is verified on Android One Karbonn Sparkle V running Android 6.0.1 (MMB29K Build) And We are not responsible for mishandle of your device


If any Problem drop down your comments

By Suresh 

Root Android One With Android 6.0 Marshmallow


Many  People Asked Me A Same Question Again And Again That's Why This Post is Made To Give Them Answer. As You Know Most Of Android One Smartphones Now Running Latest Android Version 6.0 Marshmallow Except Some People Still Using Kitket Due To Some Problems With Lollipop And Marshmallow Like Storage Issue And Hanging Due To Ram. Yes Marshmallow Have Some Problems Like Sometimes it's Automatically Rboot When You Uninstall Apps And Apps Consum More Ram Then Lollipop/Kitket Well We Can't Do Anything On That Case For Now But We Can Root it And Enjoy Some App Hacking With Lucky Patcher, Use Layers Manager , Change Font etc...

So Just Follow Below Steps And You Will Successfully Root It. Best Of Luck!


Requirements :-

  • Unlocked Bootloader
  • Flashed Any Custom Recovery : Like TWRP , CWM , Philz , CM , etc..
  • Relaxed Mind And Patience.


If You Don't Have Unlocked Bootloader And Not Flashed Any Custom Recovery We Recommended You To Use Android One Tool Kit it Will Help You To Easily Unlock Bootloader And Flash Recovery (Android One Tool Kit Won't Able To Root Android One With Marshmallow so Follow Below Steps)

Ofcourse We Are Going To Root With Super Su So Let's Go!

Warning message : By Unlocking Bootloader Warranty Will Avoided And Try This All Process At Your Own Risk We Do Not Responsible For Any Bricked Device So Make Sure You Know That What Are You Doing If You Know Then Go For It.


Method 1 ( Root With Stock Kernel )

  1. First Download Super Su V2.52
  2. Then Download MM Root Patcher.
  3. Boot Into Recovery.
  4. Now First Flash MM Root Patcher.
  5. Then Flash Super Su V2.52
  6. Reboot Device.
  7. Done You Successfully Rooted.


Method 2 ( Root With Custom Kernel )

  1. First Download Super Su V2.52
  2. Then Download Any Custom Kernel As You Wish. (Ex. Thunder Zap)
  3. Now Boot Into Recovery.
  4. Flash Custom Kernel Which You Downloaded.
  5. Then Flash Super Su V2.52
  6. That's It Now Reboot Phone.
  7. Done You Successfully Rooted.


I Hope This Post Helped You. If You Still Need Help Comment Below ;-)

Best Top 10 Templates For Blogger


Hey guys today I'm here with a useful post for Bloggers. I just selected 10 best templates from various categories and puted them here in a list. All this templates is awesome and each of then have their own advantages and mostly all listed templates are SEO Ready and Responsive. So you have to just choose one and change your blog's look. And some of listed templates are Premium but don't have to pay it's Free Here.
And don't worry about " How To Install or Apply This Template On Your Blogger " because in the zip files instructions already given and if you need Additional Help I'm here. so Enjoy Below Top 10 Templates List.


1. BlogStar


A blog for male or female bloggers and enthusiasts to write something interesting to the suitable audience in style. This is a responsive html blogger template which you can download for free.


2. Sorbet


A blogger template which seems to be inspired by wordpress hexa theme which is Very Nice. This theme is clean and responsive with more focus on typography, content  sidebar.


3. Couponism


Couponism is a high quality coupon niche blogger template created for coupon and discount business websites. It has highly professional features that are required for a website. It is clean, responsive and besides that it is retina ready for mobile devices.


4. Arcade Mag


Android Mag is a responsive gaming blogger template that will offer each and every feature that you need to run a successful gaming blog, or magazine, or multimedia site. With our robust framework, you don’t need to learn coding to edit this template because customization is made possible with just a few clicks.


5. BetaCommerce


BetaCommerce is a perfect eCommerce solution for small business owners to quickly setup an online shopping store within minutes and start selling their products with ease. BetaCommerce Shopping Blogger Template provides you multiple options for customization, easy to use flexible admin panel, and tons of professional eCommerce solution plus features. It is suitable for every online shopping site, showcase and even portfolio.


6. Movieism


Movieism is a unique and stylish entertainment blogger template which is appropriate for any kind of movie blog, cinema, movie promotion, film blogs and movie communities. Movieism comes with a separate framework that is built with latest technologies like CSS3 and HTML5.
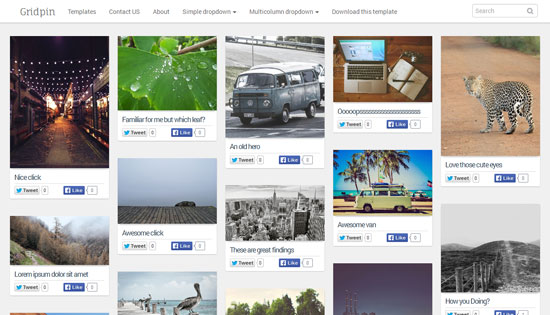


7. Grid Pin


Grid Pin is professional responsive Photography Blogger Template for sharing photos and designs. Grid Pin is making use of responsive masonry feature to give pinterest like masonry effect in home page, search pages, category pages and archive page.


8. Better Mag


Better Mag is a clean, super customizable & flexible Blogger Magazine & Blog theme with fully Responsive Design. It is created mainly for the news, magazine and blog websites but due to its supern flexiblity it allows you to create the websites for any other purposes too. When your readers visit your blog, beautifully designed featured posts slider will attract their eyes first. Better Mag is a simple way to create your Magazine or Blog, with no technical knowledge or expertise required!


9. Gamer


Gamer is a creative gaming theme for blogspot blogs. It’s simple one yet elegant with lot of amazing features like featured posts slider, subscription box, custom labels etc. to make your blog look more professional and attractive to your audiences. We have also took care of SEO, as blogger is a Google’s Child so there is less to worry about SEO.


10. Fib Mag


Fib Mag is a fresh design template which can easily take the response to give your blog a professional look. Every aspect of Fib mag is highly optimized to make it mobile and user friendly for desktop platform.


This All Templates Is Owned By That Template Creator


I Hope You Enjoyed This Post. If You Have Any doubts or Problem Let Me Know Drop Your Comments Below.

FB Auto Liker Get Unlimited Likes [100% Working Guarantee]


Hello Guys I'm here with 100% working amazing trick to get more likes on your Facebook posts. After Finding lot i found this that is really working. So how it works? It's like exchangeing likes. But it work only if your photo or post's Privacy is public. So check it before going for this trick if it's ok then i give you guarantee that it will work so let's go for action. Follow below steps and you will done


  1. Download FB Tools (2.2MB) Or Apk Squad-Liker (1.89MB)
  2. Install And Open FB Tools Or Apk Squad Liker.
  3. Click On Any Button What You Want To Do. (Example. Autoliker)
  4. In Next Screen Login With Facebook.
  5. Allow Permission To HTC Sense. (Allow it To Post As Well)
  6. Now Choose What You Want To Do Like  or Page Post. (Example. Like)
  7. Now Select You Photo or Post.
  8. Select How Much Likes You Want And Click on Submit.
  9. You Will See Message Likes Send Successfully.
  10. That's it Now it's Done Go And See Your Photo or Post Likes Which You Selected.


Do this Again And Again To Get More And More Likes.

You Can Get Up To 210 Likes At Once And After Doing Each Time You Have To Wait 15 Minutes To Use Liker Again


Screen Shots


Proof


Please Share Your Experience Is It Working Or Not By Dropping Comments Below.

Remove "Powered By Blogger" Attribution From Your Blog


Hay There Today I will Show You how to remove blogger Attribution from your blog. It's easy to but not for who is new in this Field. The main reson to do this is that when your using custom template your blog look awesome but the unremovable blogger credit make it ugly and it not look good. Because it show in a page. So this article will Help you to remove that but it won't work if your using official blogger templates because if you use this on official templates it will remove credit but it will come back again but that not happen in custom templates once you removed it will not come back accept if you add it.
And Obviously this is for blogger only. Not for WordPress.
So follow below steps and you will done

Instructions

1. First Goto Your Blogger Dashboard.
Now Got Template/Edit Html And Change Following Code.
* If you don't Have Pc then Download template And Change Following Code using Any File Editor. (For Mobile User)
2. Now Serch Below Line And Change 'true' To 'false' And Save Html.
* After Changing Upload Tample. (For Mobile User)

 <b:widget id='Attribution1' locked='true' title='' type='Attribution'> 


3. Now Goto Your Blogger Dashboard>Layout>Attribution

4. Click On Edit And in Next Screen Remove The Widget.

5. That's it Now Blogger Attribution is Removed Successfully.


If You Have And Questions Let Me Know Drop Down Your Comments Below.

Share This Article If You Found Use Full And Keep Visiting Genodroid.

Submit Blogger Sitmap To Google Webmasters


Hay guys it's first post of our new category called 'blogodroid' so let's go for the topic.
To improve traffic on your site that is hosted on blogger you need to submit sitmap to Google webmasters tools so Google serch engine can index your pages and your site get more visibility on Google Search so before we start steps you need to make sure your blogger is have custom domain if your blogger blog don't have custom domain so you don't need to submit sitmap because blogger will do already But it in limited number.

if your blog have custom domain so you can go for sitmap submission. As you know to submit sitmap Google ask for .XML file and need to upload to your site root folder like www.yoursite.com/sitmap.xml but what when you don't have hosting and you want to submit sitmap so this article is about to solve that problem.

If you have hosting you can create sitmap.xml from Here and upload it to your site's root folder and submit it in webmasters or either follow below instructions and submit it in easy way.


Instructions

  1. First Goto Google Webmasters And Sign in.
  2. Add Your Site Property (If Not Already Added) And Verify Your Ownership.
  3. After Successfully Verifying Ownership Goto Your Site Dashboard.
  4. Now Click On Sitmap.
  5. Then copy This Url atom.xml?redirect=false&start-index=1&max-results=500&m=1  And Past It.
  6. Then click on TestSitmap to Check it if There Is Any Errors. (Optional)
  7. Final Step Click On Submit Sitmap.
  8. Now Refresh The Page To See Submitted Links.
  9. That's It Now Google Serch Will Index Your Pages Currently Your Submitted Sitmap Will Be In Pending it Will Take Longer From Week To Month.

Screen Shots


So If You Have Any Questions Drop Down Your Comments Below.

CM 13 (Unofficial) for Android One Mobile Phones


Android One received Android 6.0 Marshmallow update few days ago, now CM 13 is Up for Android One Smartphones that means you can explore to the potential of all Android One Smartphones. Cyanogenmod 13 based on Android 6.0 Marshmallow forAndroid One is compiled by Swapnil Solanki, prominent developer for Android One Smartphones. Anyone can Install CM13 on Android One Phone by following the tutorial mentioned in this post.
Here is a glimpse of CM13 on Android One Smartphone:

cyanogenmod 13 for android one phones, CM13 for Android One Phones, CM13 ROM for Android One

How to Install CM13 On Android One Smartphone :


As the CM13 for Android One Devices is in beta stage, but one can test it and report the problems for CM13 ROM for Android One Smartphones. Well the procedure to Install CM13 on Android One Phone (Sprout 4) Currently is quiet similar to what we did while installing CM12.1 on Android One Smartphones.
  • Install Philz Touch Recovery on your Android One Smartphone from Here.
  • Now download CM13 ROM for Android One Smartphone (Sprout4)from Here.
  • Now Download Google Apps (Gapps) Mini From Here
  • Place CM13 ROM on SD Card and boot the phone into recovery.
  • Take backup of current ROM so that you do not face any problem when you want to revert back.
  • Now to Wipe section and select Wipe to Install New ROM.
  • Now flash the CM13 ROM by going to Install Zip from SD Card.
  • Once completed, restart the phone. And you will be booted to CM13 on Android One!
  • Flash the Google Apps if required by you and enjoy the ROM!

First startup takes little time, therefore be patient as your Android One phone boots with CM13, Video tutorial to Install CM13 on Android One Phone will be soon available to guide you all better. Do Subscribe to the website for further more updates regarding Android One SmartPhones!

Create Transparent Logo Or Icon Without PC


Createing own transparent logo or icon is not difficult in Pc but what if you don't have pc or any resonance you can't access it ?
It's simple you can create logo and get transparent icons from many online sites but what if you want to create your totally own logo or icon with your own font ?
That's way this article is for to give you solution.

You can build Your transparent logo or icon with popular photo editing app Called PicsArt.
So just Follow Instructions Given Below and you will done.

Instructions

1. Download Picsart App if your not using already.

2. Open Picsart App then open Draw And Choose Blank background.


3. Now set Resolution you want and click ok.


4. Click on layers icon and open slide bar.


5. Now close 2d eye button and select transparent one.


6. Now Draw anything you want or add text with your favourite fonts (you can also do it after saving as draft).


7. Click on save and save it as .PNG


8. Done your transparent image is ready go and check in gallery.

Note:- Don't save image as .jpeg because it doesn't suport transparent image that's way all icons and transparent logos comes in .Png Format so save in .PNG format if you want your image in transparent.


Any question comment below..

Contact Us

Name

Email *

Message *